在 Ionic + Angular 应用中使用 Firebase 推送通知
Web 框架: Angular 平台: iOS, Android
应用开发者向用户提供的最常见功能之一就是推送通知。本教程将逐步介绍如何在 iOS 和 Android 上实现 Firebase 云消息推送 功能。
为了从 Firebase 注册和监控推送通知,我们将在 Ionic + Angular 应用中使用 Capacitor 的推送通知 API。
所需依赖
使用 Capacitor 构建和部署 iOS 和 Android 应用需要进行一些设置。请先 按照这里的说明安装必要的 Capacitor 依赖,然后再继续。
要在 iOS 上测试推送通知,Apple 要求您拥有 付费的 Apple 开发者账户。
另外,我们使用 Firebase 进行推送通知,如果您使用其他使用 Firebase SDK 的 Cordova 插件,请确保它们是最新版本。
准备 Ionic Capacitor 应用
如果您已有现有的 Ionic 应用,请跳过此部分。如果没有,让我们先创建一个 Ionic 应用。
在您首选的终端中,安装最新版本的 Ionic CLI:
npm install -g @ionic/cli
接下来,让我们使用 CLI 基于 blank 起始项目创建一个新的 Ionic Angular 应用,并将其命名为 capApp:
ionic start capApp blank --type=angular
应用成功创建后,切换到新创建的项目目录:
cd capApp/
最后编辑 capacitor.config.ts 中的 appId:
const config: CapacitorConfig = {
- appId: 'io.ionic.starter',
+ appId: 'com.mydomain.myappnam',
  appName: 'capApp',
  webDir: 'www'
};
构建应用并添加平台
在向此项目添加任何原生平台之前,必须至少构建一次应用。Web 构建会创建 Capacitor 所需的 Web 资源目录(Ionic Angular 项目中的 www 文件夹)。
ionic build
接下来,让我们向应用添加 iOS 和 Android 平台。
ionic cap add ios
ionic cap add android
运行这些命令后,将在项目根目录创建 android 和 ios 文件夹。这些是完全独立的原生项目工件,应视为 Ionic 应用的一部分(即,将其纳入版本控制)。
使用 Capacitor 推送通知 API
首先,我们需要安装 Capacitor 推送通知插件
npm install @capacitor/push-notifications
npx cap sync
然后,在我们开始使用 Firebase 之前,需要确保应用能够使用 Capacitor 推送通知 API 注册推送通知。我们还将添加一个 alert(您也可以使用 console.log 语句)来显示当通知到达时设备上已打开应用的通知负载。
在您的应用中,前往 home.page.ts 文件,添加 import 语句和 const 以使用 Capacitor Push API:
import { ActionPerformed, PushNotificationSchema, PushNotifications, Token } from '@capacitor/push-notifications';
然后,添加 ngOnInit() 方法以及一些 API 方法来注册和监控推送通知。我们还将添加几个事件的 alert() 来监控正在发生的情况:
export class HomePage implements OnInit {
  ngOnInit() {
    console.log('Initializing HomePage');

    // 请求使用推送通知的权限
    // iOS 会提示用户并返回是否授予权限
    // Android 会直接授予而不提示
    PushNotifications.requestPermissions().then((result) => {
      if (result.receive === 'granted') {
        // 向 Apple/Google 注册以通过 APNS/FCM 接收推送
        PushNotifications.register();
      } else {
        // 显示错误信息
      }
    });

    // 成功时,我们应该能够接收通知
    PushNotifications.addListener('registration', (token: Token) => {
      alert('推送注册成功,token: ' + token.value);
    });

    // 我们的设置有问题,推送将无法工作
    PushNotifications.addListener('registrationError', (error: any) => {
      alert('注册错误: ' + JSON.stringify(error));
    });

    // 如果应用在我们的设备上打开,则显示通知负载
    PushNotifications.addListener('pushNotificationReceived', (notification: PushNotificationSchema) => {
      alert('收到推送: ' + JSON.stringify(notification));
    });

    // 点击通知时调用的方法
    PushNotifications.addListener('pushNotificationActionPerformed', (notification: ActionPerformed) => {
      alert('推送操作执行: ' + JSON.stringify(notification));
    });
  }
}
以下是 home.page.ts 的完整实现:
import { Component, OnInit } from '@angular/core';

import { ActionPerformed, PushNotificationSchema, PushNotifications, Token } from '@capacitor/push-notifications';

@Component({
  selector: 'app-home',
  templateUrl: 'home.page.html',
  styleUrls: ['home.page.scss'],
})
export class HomePage implements OnInit {
  ngOnInit() {
    console.log('Initializing HomePage');

    // Request permission to use push notifications
    // iOS will prompt user and return if they granted permission or not
    // Android will just grant without prompting
    PushNotifications.requestPermissions().then((result) => {
      if (result.receive === 'granted') {
        // Register with Apple / Google to receive push via APNS/FCM
        PushNotifications.register();
      } else {
        // Show some error
      }
    });

    PushNotifications.addListener('registration', (token: Token) => {
      alert('Push registration success, token: ' + token.value);
    });

    PushNotifications.addListener('registrationError', (error: any) => {
      alert('Error on registration: ' + JSON.stringify(error));
    });

    PushNotifications.addListener('pushNotificationReceived', (notification: PushNotificationSchema) => {
      alert('Push received: ' + JSON.stringify(notification));
    });

    PushNotifications.addListener('pushNotificationActionPerformed', (notification: ActionPerformed) => {
      alert('Push action performed: ' + JSON.stringify(notification));
    });
  }
}
之后,您需要生成新的构建并让 Capacitor 了解更改。您可以使用以下命令:
ionic build
npx cap copy
在 Firebase 上为您的应用创建项目
在我们能够将 Firebase 云消息推送连接到您的应用并发送推送通知之前,您需要在 Firebase 中启动一个项目。
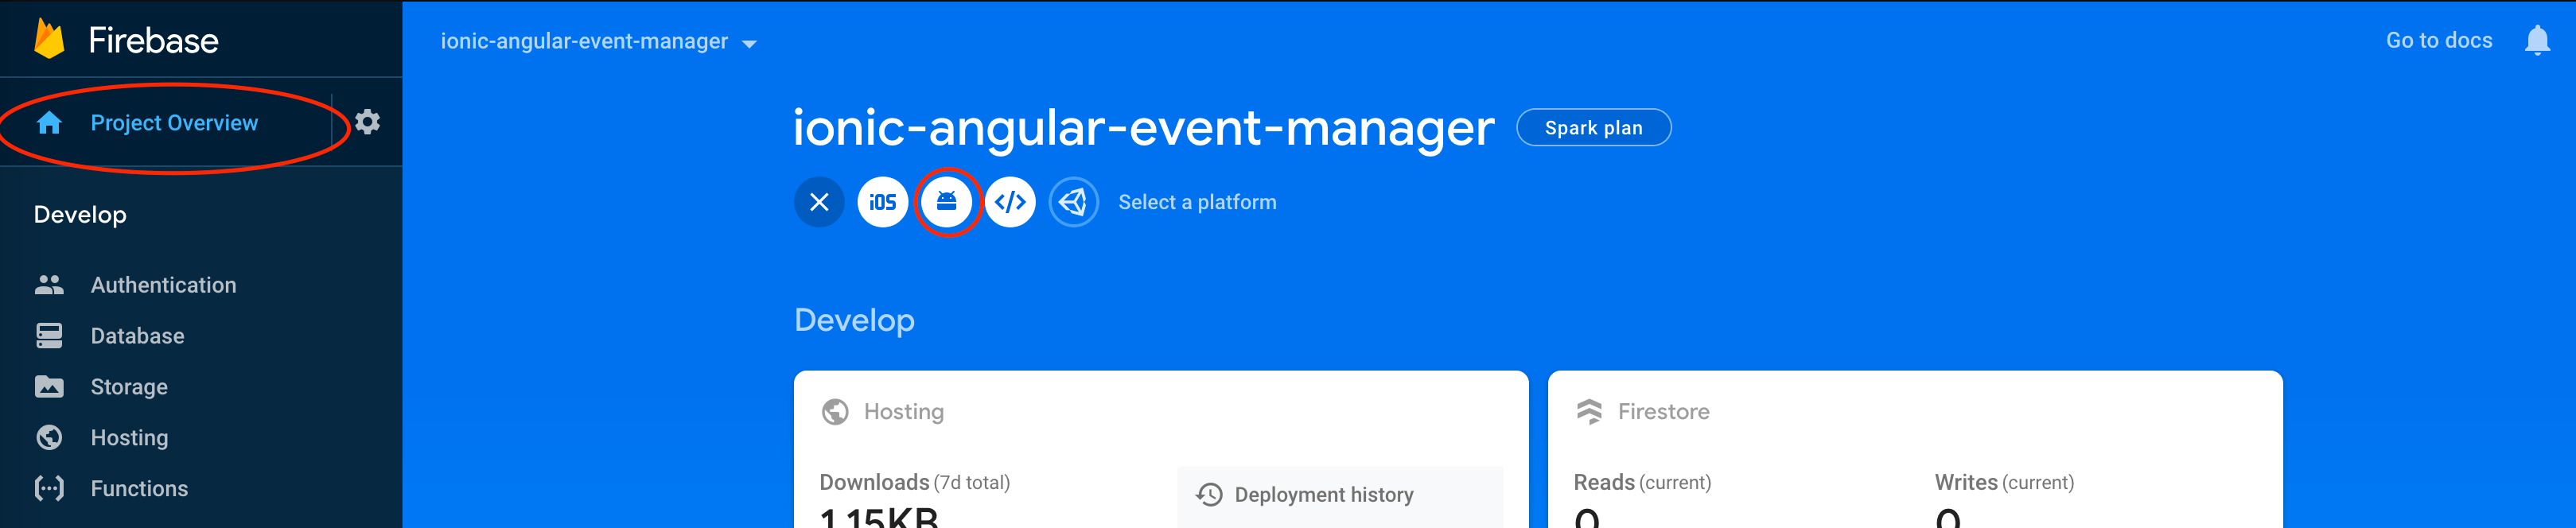
前往 Firebase 控制台 并点击 添加项目 按钮。
命名项目,接受 Firebase 服务条款,然后点击 创建项目 继续。系统应自动为您生成项目 ID。
Android### 将 Firebase 集成到 Android 应用中
本节内容大致遵循 使用 Firebase 控制台设置 Firebase 的文档。以下是针对 Capacitor 的相关注意事项。
进入您的 Firebase 项目的项目概览页面,在顶部点击 Android 图标以添加一个新的 Android 应用程序。
下一个屏幕将要求您填写应用程序的一些信息。
- 您的 Android 包名 应与
capacitor.config.ts文件中的 appId 保持一致 - 在本例中,我们为 Capacitor 应用 ID 使用了
com.mydomain.myappname,因此在此处也将使用相同的值。 - 昵称和调试签名证书是可选项
然后点击 注册应用 按钮。
下载并使用 google-services.json 文件
接下来的提示会要求您下载 google-services.json 文件。该文件包含了您的 Capacitor 应用在 Android 端连接 Firebase 所需的信息。
将 google-services.json 文件下载到本地计算机。然后将其移动到您的 Capacitor Android 项目目录中,具体位置是 android/app/ 下。
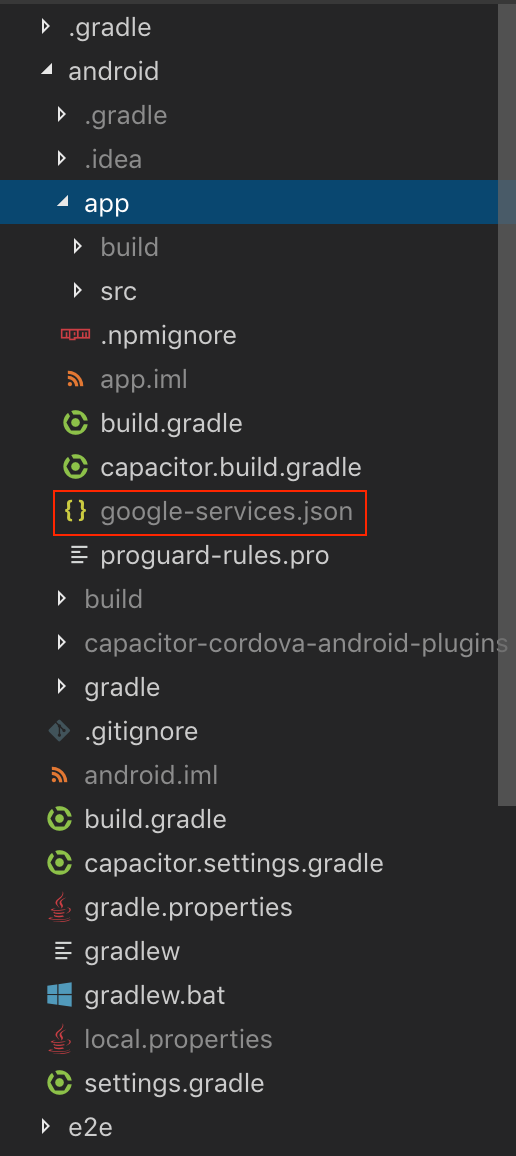
我们无需向项目中 添��加 任何依赖项,因为 @capacitor/push-notifications 会自动在其 build.gradle 文件中包含某个版本的 firebase-messaging。
iOS
前提条件
在 iOS 上设置推送通知比 Android 要复杂得多。您必须拥有 付费的 Apple 开发者账户 并且 在能够测试 iOS 应用的推送通知之前,完成以下事项:
- 在 Apple 开发者门户中为您的 iOS 应用程序 设置正确的开发或生产证书及描述文件
- 在 Apple 开发者门户中为开发或生产环境 创建一个 APNS 证书或密钥
- 在 Xcode 中为您的应用程序 确保已启用推送通知功能
将 Firebase 集成到我们的原生 iOS 应用中
这部分与上面的 Android 部分非��常相似,但有几个关键区别。
首先,进入您的 Firebase 项目的 项目概览 页面。如果您一直遵循本指南,您会看到页面顶部已列出了一个 Android 应用程序。
要向您的 Firebase 项目添加 iOS 应用,请点击 添加应用 按钮并选择 iOS 平台。
下一个屏幕将要求您填写应用程序的一些信息。
- 您的 iOS 包标识符 应与
capacitor.config.ts文件中的 appId 保持一致 - 在本例中,我们为 Capacitor 应用 ID 使用了
com.mydomain.myappname,因此在此处也将使用相同的值。 - 应用昵称和应用商店 ID 是可选项
然后点击 注册应用 按钮。
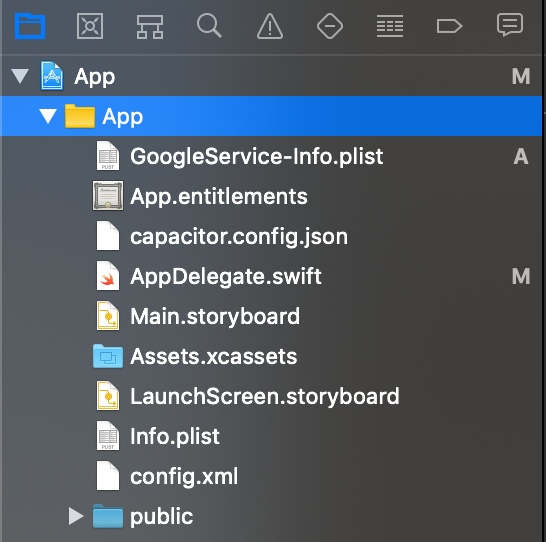
将 GoogleService-Info.plist 文件添加到您的 iOS 应用中
注意:这 不是 用于 Android 应用的那个文件。
将提供的 GoogleService-Info.plist 文件下载到本地计算机。
接着,您需要打开 Xcode...
npx cap open ios
... 并按照 Firebase 的说明将 .plist 文件移动到您的 Xcode 项目中,确保将其添加到所有目标。
通过 CocoaPods 添加 Firebase SDK
iOS 上的推送通知 API 使用了 CocoaPods(一个 iOS 依赖管理工具),我们需要告诉 CocoaPods 使用 Firebase。
为此,我们需要修改 Podfile,该文件可以在 Xcode 的 Pods 目录下找到:
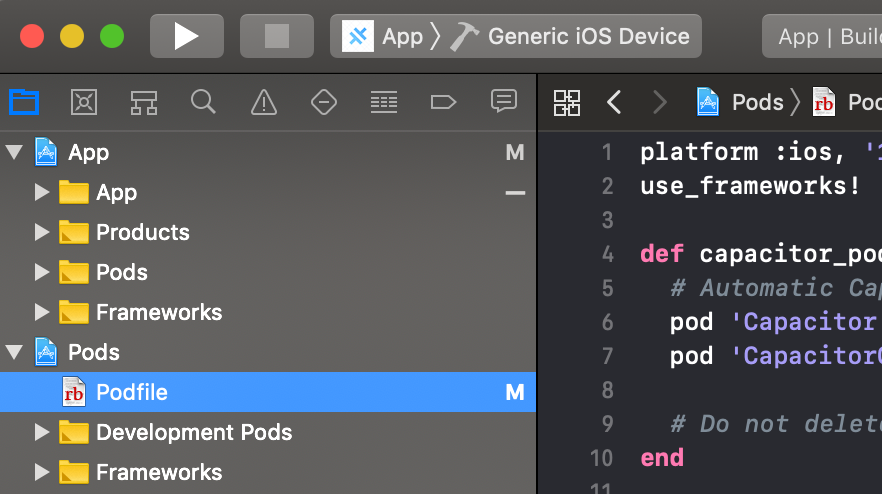
我们需要将 Firebase 添加到为我们的 App 目标提供的 CocoaPods 中。为此,在 target 'App' 部分添加 pod 'FirebaseMessaging',如下所示:
target 'App' do
  capacitor_pods
  # 在此处添加您的 Pods
  pod 'FirebaseMessaging' # 添加这一行
end
您的 Podfile 应该看起来像这样:
require_relative '../../node_modules/@capacitor/ios/scripts/pods_helpers'

platform :ios, '13.0'
use_frameworks!

# 避免 Xcode 缓存 Pods 的变通方案,该方案要求
# 在安装新的 Cordova 插件后执行 Product -> Clean Build Folder
# 需要 CocoaPods 1.6 或更高版本
install! 'cocoapods', :disable_input_output_paths => true

def capacitor_pods
  pod 'Capacitor', :path => '../../node_modules/@capacitor/ios'
  pod 'CapacitorCordova', :path => '../../node_modules/@capacitor/ios'
  pod 'CapacitorApp', :path => '../../node_modules/@capacitor/app'
  pod 'CapacitorHaptics', :path => '../../node_modules/@capacitor/haptics'
  pod 'CapacitorKeyboard', :path => '../../node_modules/@capacitor/keyboard'
  pod 'CapacitorPushNotifications', :path => '../../node_modules/@capacitor/push-notifications'
  pod 'CapacitorStatusBar', :path => '../../node_modules/@capacitor/status-bar'
end

target 'App' do
  capacitor_pods
  # 在此处添加您的 Pods
  pod 'FirebaseMessaging'
end

post_install do |installer|
  assertDeploymentTarget(installer)
end
更新项目
现在我们需要确保我们的 iOS 项目已更新,并安装了正确的 Firebase CocoaPod。
注意:这部分可能需要一些时间,因为 CocoaPods 需要下载所有相关的文件/依赖项。
npx cap update ios
```### 添加初始化代码
当你的 iOS 应用启动时,需要�连接到 Firebase。你需要在 `AppDelegate.swift` 文件中添加以下内容。
首先,在文件顶部添加 `import`:
```swift
import FirebaseCore
import FirebaseMessaging
……然后将 Firebase 的配置方法添加到 AppDelegate.swift 文件的初始化代码中,具体放在 application(didFinishLaunchingWithOptions) 方法内。
FirebaseApp.configure()
接着,你需要添加以下两个方法,以正确处理推送注册事件:
func application(_ application: UIApplication, didRegisterForRemoteNotificationsWithDeviceToken deviceToken: Data) {
  Messaging.messaging().apnsToken = deviceToken
  Messaging.messaging().token(completion: { (token, error) in
    if let error = error {
        NotificationCenter.default.post(name: .capacitorDidFailToRegisterForRemoteNotifications, object: error)
    } else if let token = token {
        NotificationCenter.default.post(name: .capacitorDidRegisterForRemoteNotifications, object: token)
    }
  })
}

func application(_ application: UIApplication, didFailToRegisterForRemoteNotificationsWithError error: Error) {
  NotificationCenter.default.post(name: .capacitorDidFailToRegisterForRemoteNotifications, object: error)
}
完整的 AppDelegate.swift 文件应类似如下:
import UIKit
import Capacitor
import FirebaseCore
import FirebaseMessaging

@UIApplicationMain
class AppDelegate: UIResponder, UIApplicationDelegate {

  var window: UIWindow?


  func application(_ application: UIApplication, didFinishLaunchingWithOptions launchOptions: [UIApplication.LaunchOptionsKey: Any]?) -> Bool {
    // 应用启动后的自定义点
    FirebaseApp.configure()
    return true
  }

  func application(_ application: UIApplication, didRegisterForRemoteNotificationsWithDeviceToken deviceToken: Data) {
    Messaging.messaging().apnsToken = deviceToken
    Messaging.messaging().token(completion: { (token, error) in
      if let error = error {
          NotificationCenter.default.post(name: .capacitorDidFailToRegisterForRemoteNotifications, object: error)
      } else if let token = token {
          NotificationCenter.default.post(name: .capacitorDidRegisterForRemoteNotifications, object: token)
      }
    })
  }

  func application(_ application: UIApplication, didFailToRegisterForRemoteNotificationsWithError error: Error) {
    NotificationCenter.default.post(name: .capacitorDidFailToRegisterForRemoteNotifications, object: error)
  }
将 APNS 证书或密钥上传到 Firebase
如果你从头开始遵循了上述步骤,那么你已经在 Apple 开发者门户中创建了 Apple APNS 证书或 APNS 认证密钥。在 Firebase 能够与 APNS 通信并向你的应用发送推送通知之前,你需要将其中之一上传到 Firebase。
要上传证书或认证密钥,请从项目概览页面:
- 点击你的 iOS 应用,然后点击设置齿轮图标。
- 在设置页面,点击Cloud Messaging 标签页。
- 在 iOS 应用配置 标题下,使用提供的 上传 按钮上传你的认证密钥或证书。
发送测试通知
现在是激动人心的部分——让我们验证 Firebase 的推送通知在 Android 和 iOS 上是否正常工作!
我们需要在 Android 或 iOS 上启动应用,以便我们的 home.page.ts 页面能够注册并接收通知。
要在 Android Studio 中打开你的 Android 项目:
npx cap open android
要在 Xcode 中打开你的 iOS 项目:
npx cap open ios
项目打开后,使用 Android Studio 或 Xcode 的运行功能,将应用侧载到你的设备上。应用应该会在首页启动。
注意:在 iOS 上,你会看到一个弹窗,询问你是否允许应用发送通知——请务必选择 允许通知!
如果你的应用成功注册,并且你遵循了上述代码,你应该会看到一个包含成功消息的弹窗!
现在我们来测试设备是否能收到通知。要发送通知,请在 Firebase 中,进入项目面板“增长”标题下的 Cloud Messaging 部分。
接下来,选择 新建通知 按钮。
创建通知时,你只需指定以下信息:
- 通知的文本内容
- 标题(仅限 Android,iOS 为可选)
- 目标(可以是用户群组或主题;建议直接针对 iOS 或 Android 应用本身,见下图)
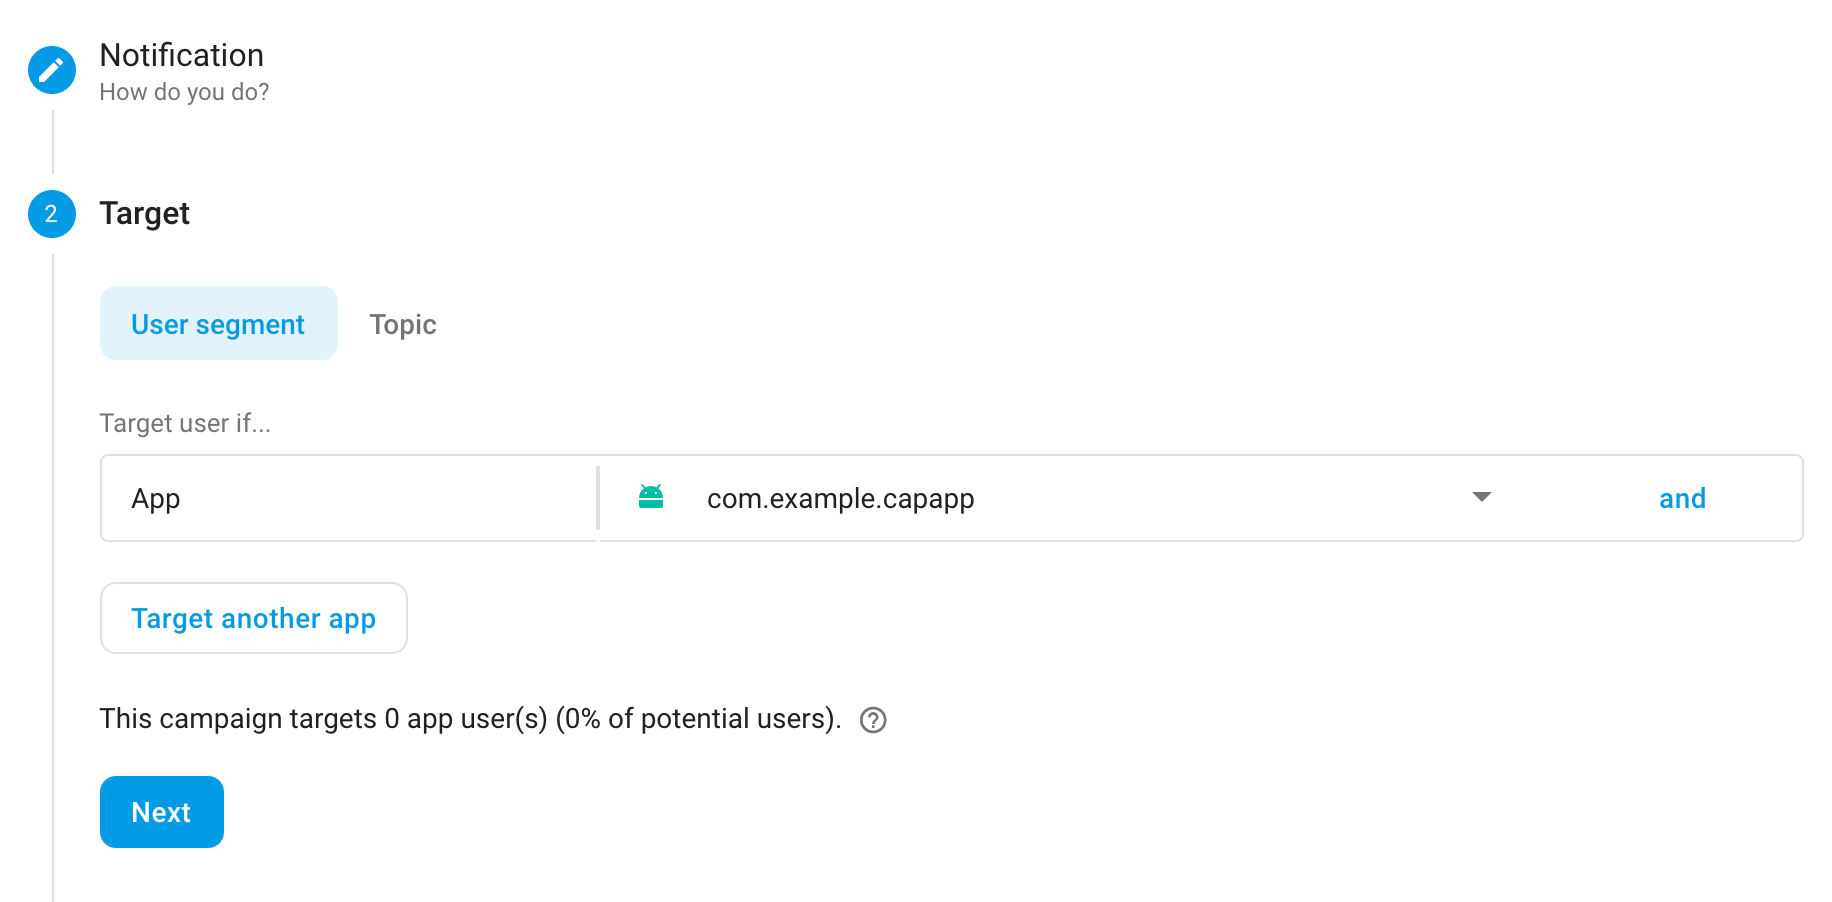
- 调度(保持为“立即”)
此时,你可以审核你组合的通知,然后选择发布来发送通知。
如果你正确设置了应用,你将在主屏幕上看到一个弹窗,显示你在 Firebase 中编写的推送通知。然后你可以点击通知,根据我们上面的代码,你应该会收到 pushActionPerformed 事件的 alert。
推送通知中的图片
你可以选择在推送通知中包含图片,具体请遵循以下指南。
Firebase Messaging SDK 可以在其负载中包含 ImageUrl 属�性并显示该图片。URL 必须是 https:// 格式,且大小不超过 300kb。
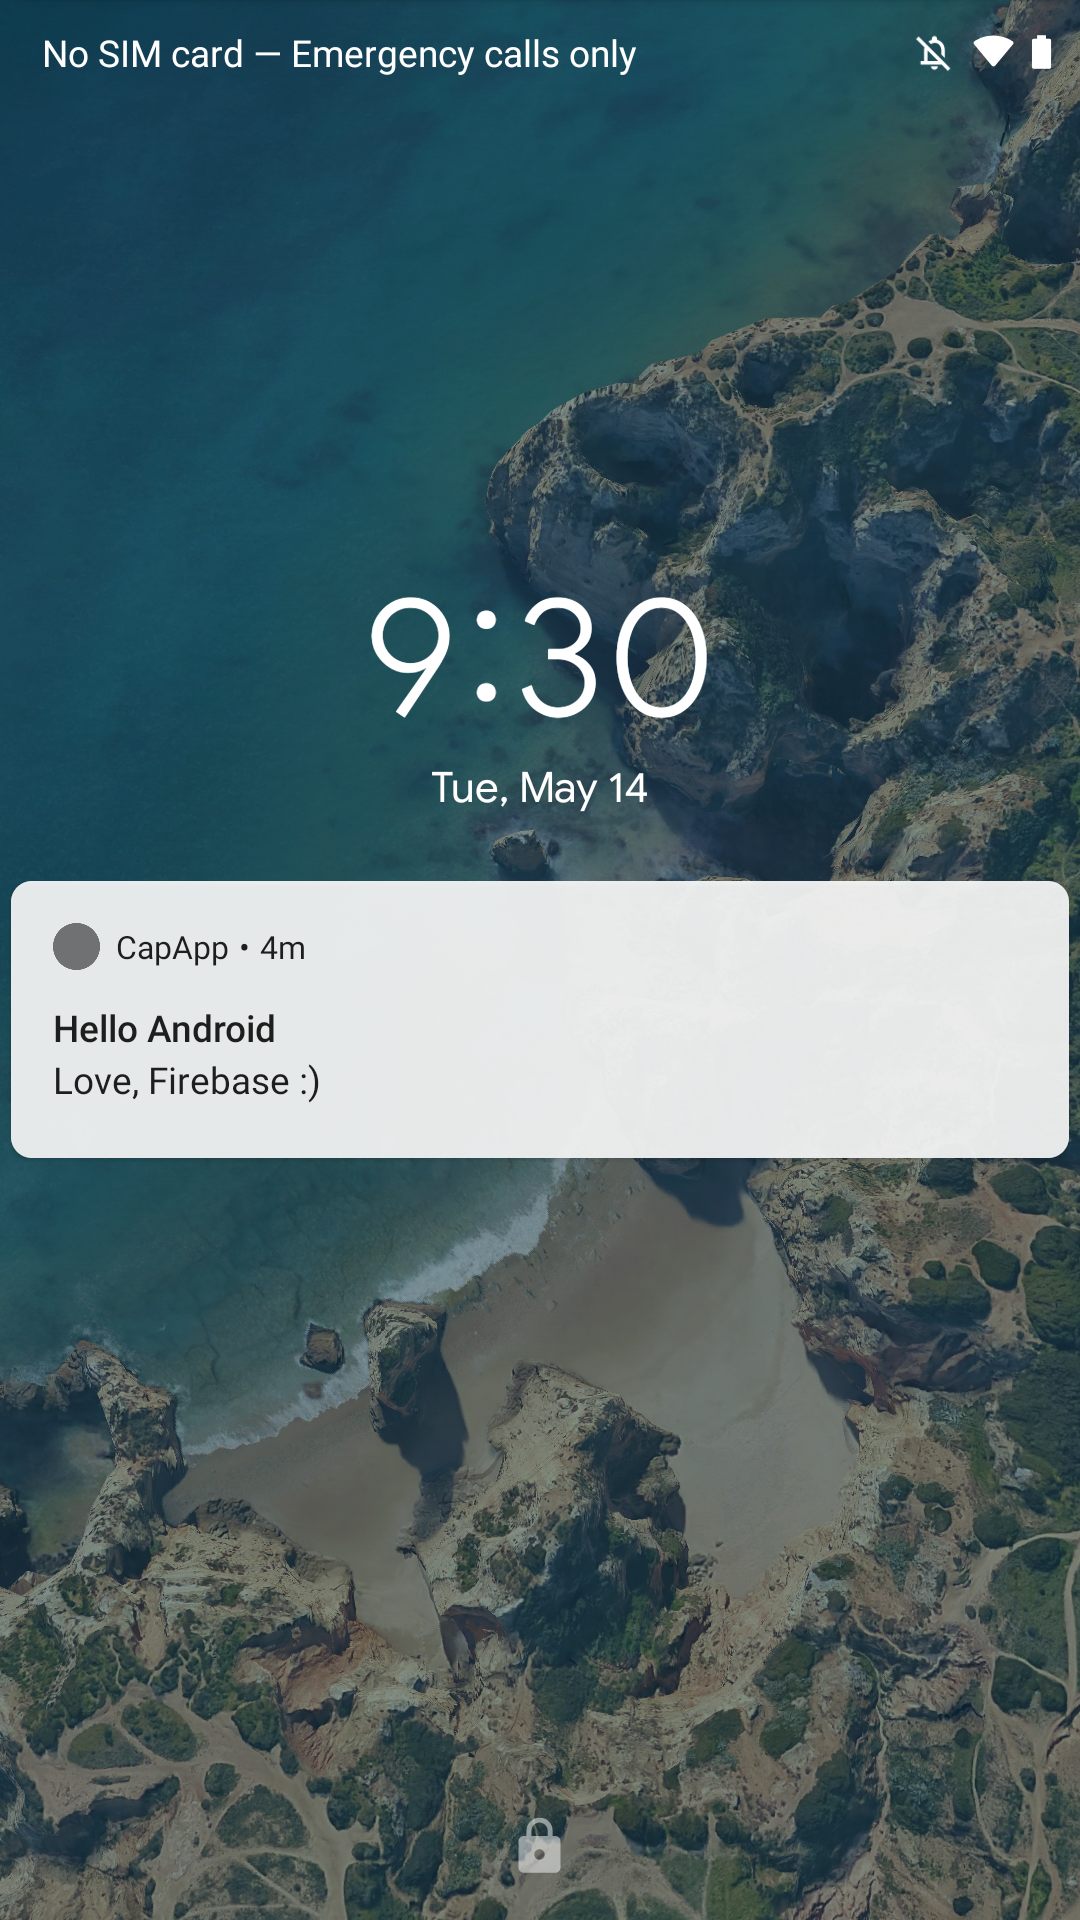
Android 图片处理
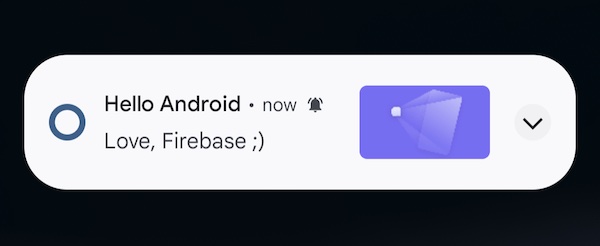
Android 在使用 @capacitor/push-notifications 时会自动显示图片。如果你在 Firebase Console 中通过设置 Notification image 来测试此功能,推送通知将出现在 Android 设备上,效果类似于下面的截图:
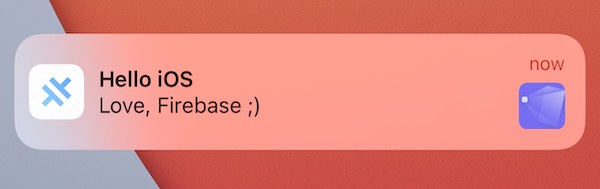
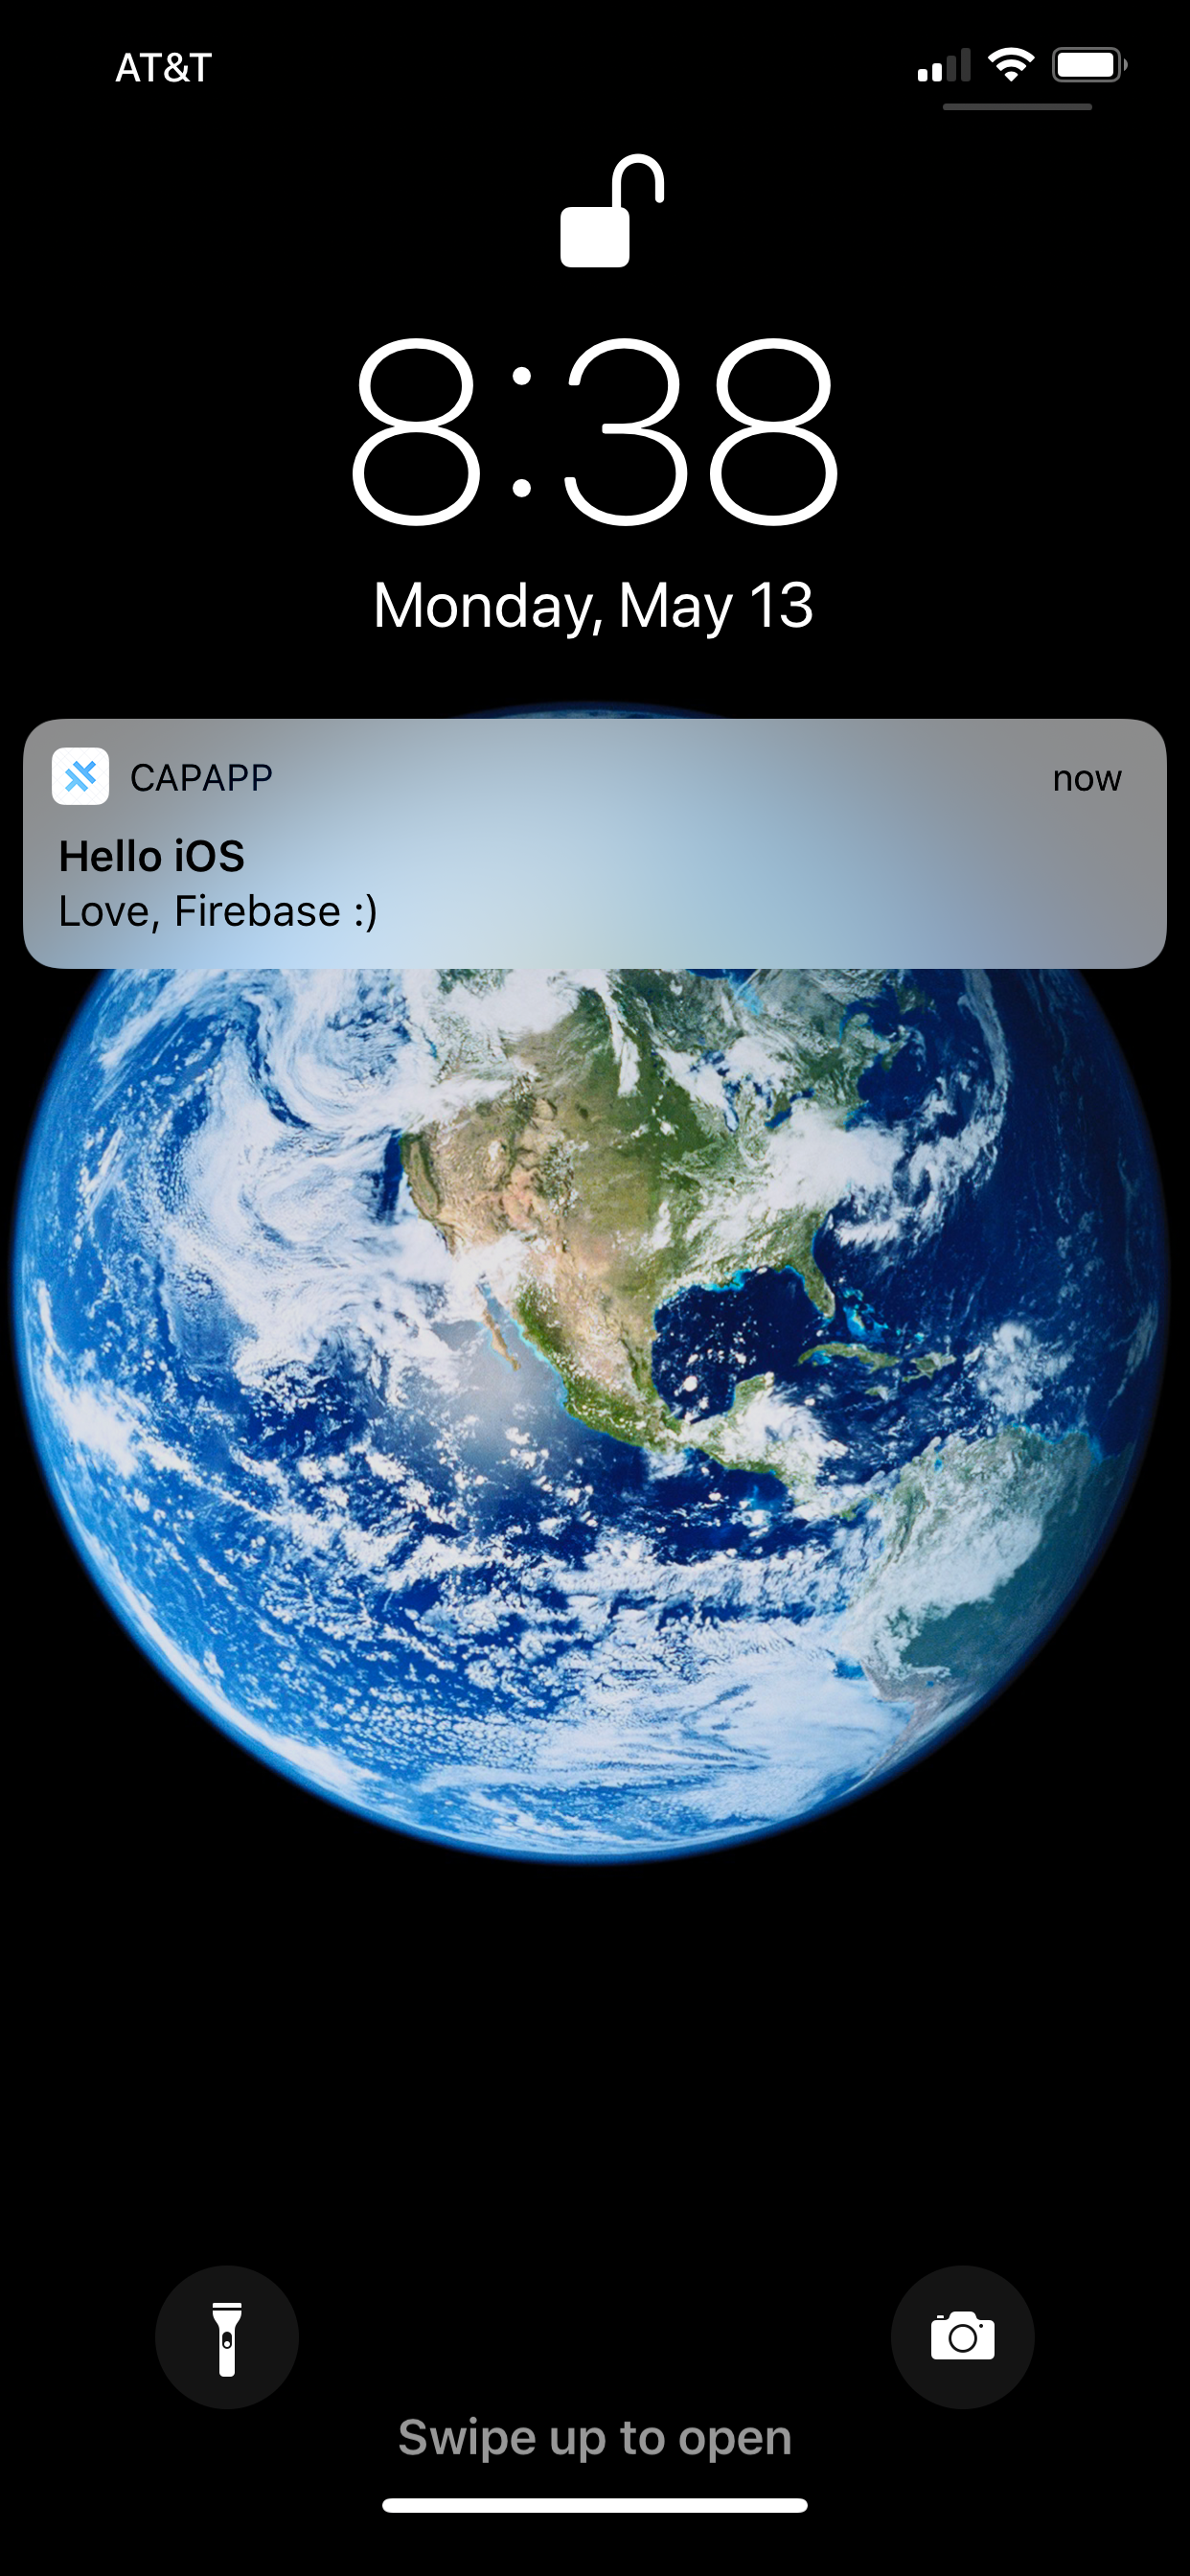
 ### iOS 上的图片推送
要在 iOS 设备上显示包含图片的推送通知,你的项目需要添加一个 通知服务扩展(Notification Service Extension)。
在 Xcode 中操作如下:
- 点击
File>New>Target - 选择
Notification Service Extension,然后点击Next - 输入
Product Name(例如pushextension) - 选择你的团队(Team)
- 点击
Finish - 提示时点击
Activate
从目标(Targets)列表中选择 pushextension,然后:
- 点击
Signing & Capabilities - 点击
+ Capability - 选择
Push Notifications - 将部署目标从
iOS 16.4(或 Xcode 选择的版本)改为iOS 13.0
如果不修改扩展的部署目标,图片将无法在较低版本的 iOS 设备上显示。
要为扩展添加 Firebase 消息支持,请打开你的 Podfile 并添加:
target 'pushextension' do
  pod 'FirebaseMessaging'
end
然后运行以下命令更新 Cocoapods:
npx cap update ios
现在打开 NotificationService.swift(它位于名为 pushextension 的文件夹中),并将内容替换为以下代码:
import UserNotifications
import FirebaseMessaging

class NotificationService: UNNotificationServiceExtension {
    var contentHandler: ((UNNotificationContent) -> Void)?
    var bestAttemptContent: UNMutableNotificationContent?

    override func didReceive(_ request: UNNotificationRequest, withContentHandler contentHandler: @escaping (UNNotificationContent) -> Void) {
        guard let content = request.content.mutableCopy() as? UNMutableNotificationContent else { return }
        self.contentHandler = contentHandler
        self.bestAttemptContent = content

        FIRMessagingExtensionHelper().populateNotificationContent(content, withContentHandler: contentHandler)
    }

    override func serviceExtensionTimeWillExpire() {
        guard let contentHandler = contentHandler,
              let bestAttemptContent =  bestAttemptContent else { return }

        contentHandler(bestAttemptContent)
    }
}
现在,你可以从 Firebase 控制台 测试一个推送通知。记得设置 Notification image 并选择你的 iOS 应用。当通知到达 iOS 设备时,图片会显示在右侧,如下所示: