在您的应用中升级 Capacitor 到 3.0
Capacitor 3 为生态系统带来了关键更新和令人兴奋的新功能。
在将您的应用升级到 Capacitor 3 之后,您是否愿意在此讨论中分享您的任何反馈?我们很乐意听取您的意见!💖
如果您是插件作者,希望将您的插件升级到更新的 Capacitor 版本,请参阅Capacitor 插件升级指南。
NodeJS 12+
Node 8 已结束生命周期。Node 10 将于 2021 年 4 月 30 日结束生命周期。Capacitor 3 需要 NodeJS 12 或更高版本。(建议使用最新的 LTS 版本。)
Ionic CLI
如果您正在使用 Ionic CLI,官方对 Capacitor 3 的支持从版本 6.16.0 开始。我们建议此时通过 npm install -g @ionic/cli 升级到最新版本。
更新 Capacitor CLI 和 Core
npm install @capacitor/cli@latest-3 @capacitor/core@latest-3
ES2017+
Capacitor 3 现在针对 ES2017 环境构建,而不是 ES5。插件模板也已更新以针对 ES2017,鼓励第三方插件更新其目标。
除非您支持 IE11(Capacitor 不正式支持),否则此更改不应影响您的应用。
TypeScript 3.8+
Capacitor 3 使用较新的 TypeScript 语法,该语法只能在 TS 3.8 或更高版本中使用。
Capacitor 配置变更
如果您安装了 TypeScript 3.8+,可以将 capacitor.config.json 迁移为类型化的 TypeScript 配置文件,命名为 capacitor.config.ts。您可以继续使用 .json 文件,但 TypeScript 配置文件可能会为您的团队提供更好的开发体验。以下是 Capacitor 测试应用中使用的 capacitor.config.ts 文件示例。
/// <reference types="@capacitor/local-notifications" />
/// <reference types="@capacitor/push-notifications" />
/// <reference types="@capacitor/splash-screen" />

import { CapacitorConfig } from '@capacitor/cli';

const config: CapacitorConfig = {
  appId: 'com.capacitorjs.app.testapp',
  appName: 'capacitor-testapp',
  webDir: 'build',
  plugins: {
    SplashScreen: {
      launchAutoHide: false,
    },
    LocalNotifications: {
      smallIcon: 'ic_stat_icon_config_sample',
      iconColor: '#CE0B7C',
    },
    PushNotifications: {
      presentationOptions: ['alert', 'sound'],
    },
  },
};

export default config;
官方插件
所有插件都已从 Capacitor 核心中移除,并放置到它们自己的 npm 包中。这样做有几个原因(参见 #3227),核心团队确信这是正确的方向。您可以像这样导入核心插件。
import { Camera } from '@capacitor/camera';
移除了后台任务、权限和照片插件
- 后台任务:此插件似乎很少使用,并且工作方式与大多数开发人员的预期不太一样。核心团队将在未来重新考虑后台功能。请关注 #3032 获取更新。
- 权限:核心团队已实现了这种集中式方法的替代方案,社区插件也可能采用(参见新的权限 API)。
- 照片:这个未记录的仅限 iOS 的插件已被移除。请使用
@capacitor-community/media。
可访问性、应用和模态框插件拆分
- 可访问性
- VoiceOver 和 TalkBack 功能已移至屏幕阅读器
- 应用
- 模态框
迁移您的应用以使用新的官方插件包
此更改将要求您单独安装您正在使用的每个插件。
- 在您的项目中搜索从
@capacitor/core的Plugins对象中提取的核心插件 - 找到相应的插件文档,请注意某些插件已被拆分
- 按照文档中每个插件的安装说明操作
- 将插件导入更改为从插件包导入(参见插件导入)
- 按照向后不兼容的插件更改中的任何说明操作
使用 Ionic Framework 吗?
Ionic Framework 使用了以下插件中的 API:
为了获得 Ionic Framework 的最佳用户体验,即使您没有在应用中导入这些插件,也应确保已安装它们:
npm install @capacitor/app @capacitor/haptics @capacitor/keyboard @capacitor/status-bar
插件导入
Plugins 对象已被弃用,但在 Capacitor 3 中将继续工作。Capacitor 插件应更新以使用新的插件注册 API(参见插件升级指南),这将允许它们直接从插件包导入。
今后,不应再使用来自 @capacitor/core 的 Plugins 对象。
// 旧方式
import { Plugins } from '@capacitor/core';
const { AnyPlugin } = Plugins;
直接从插件包导入插件是首选方式,但插件必须更新才能与 Capacitor 3 兼容,这样才可能实现。
// 新方式
import { AnyPlugin } from 'any-plugin';
```## 向后不兼容的插件变更

虽然许多插件 API 保持不变以简化迁移到 Capacitor 3 的过程,但有些 API 需要进行代码更新和手动迁移。

- **辅助功能** / **屏幕阅读器**
  - `isScreenReaderEnabled()` 方法已重命名为 `isEnabled()`
  - `'accessibilityScreenReaderStateChange'` 事件已重命名为 `'stateChange'`
  - 在 Android 和 iOS 上,`speak()` 仅当屏幕阅读器当前激活时才有效。对于无论屏幕阅读器是否激活都需要文本转语音功能的场景,请使用 [`@capacitor-community/text-to-speech`](https://github.com/capacitor-community/text-to-speech)
- **浏览器**
  - `prefetch()` 已被移除
- **设备**
  - 应用信息已从 `getInfo()` 中移除 (`appVersion`、`appBuild`、`appId` 和 `appName`)。请使用 App 插件的 [`getInfo()`](/apis/app.md#getinfo) 来获取这些信息
  - `uuid` 已从 `getInfo()` 中移除。请使用新的 `getId()` 函数
- **触觉反馈**
  - `HapticsNotificationType` 枚举键已从大写改为驼峰命名以匹配其他枚举
- **本地通知**
  - 该插件现在使用新的权限 API。`requestPermission()` 已被移除,请使用 `requestPermissions()`
- **推送通知**
  - 该插件现在使用新的权限 API。`requestPermission()` 已被移除,请使用 `requestPermissions()`
- **分享**
  - `share()` 方法现在返回 `ShareResult` 而不是 `any`
  - `share()` 的返回值将不再包含 `completed`。如果分享未完成,将会拒绝而不是返回未完成状态
- **存储**
  - **需要数据迁移!** 内部存储机制已更改,需要进行数据迁移。已添加了一个便捷方法:`migrate()`。要在不影响最终用户的情况下更新应用,请在调用任何其他方法之前调用 `migrate()`
- **文件系统**
  - `stat()` 方法现在在所有平台上都以毫秒为单位返回 ctime 和 mtime 时间戳。之前,iOS 返回的时间戳是以秒为单位的

## 日志记录变更

`hideLogs` 配置选项在 Capacitor 3 中已被弃用。它已被新的 `loggingBehavior` 配置选项取代。详细信息可以在[配置文档](/main/reference/config.md)中找到

## iOS

Capacitor 3 支持 iOS 12+。需要 Xcode 12+。推荐使用 CocoaPods 1.8+。

### 更新 CocoaPods

建议将 CocoaPods 升级到最新稳定版本。[CocoaPods 1.8](https://blog.cocoapods.org/CocoaPods-1.8.0-beta/) 切换到使用 CDN,这意味着不再需要定期运行 `pod repo update`。

使用 `pod --version` 检查你的 CocoaPods 版本,并访问 [cocoapods.org](https://cocoapods.org) 获取安装说明。

### 将 iOS 部署目标设置为 12.0

为你的 Xcode 项目和应用程序目标执行以下操作:打开 **Build Settings** 选项卡。在 **Deployment** 部分下,将 **iOS Deployment Target** 更改为 **iOS 12.0**。

然后,打开 `ios/App/Podfile` 并将 iOS 版本更新为 12.0:

```diff
-platform :ios, '11.0'
+platform :ios, '12.0'
 use_frameworks!
将 Swift 版本设置为 5
如果你的应用尚未使用 Swift 5,请打开 Xcode 目标中的 Build Settings 选项卡,然后在 Swift Compiler - Language 部分下将 Swift Language Version 更改为 Swift 5。
将 public 移动到 iOS 目标目录中
Capacitor 3 建议将 ios/App/public 目录移动到 ios/App/App/public。这可以在 Xcode 中完成:
删除现有的 public 文件夹
- 展开
App项目下的文件树,然后是App组,选择public文件夹 - 右键单击 Delete。当提示删除文件夹或仅删除引用时,选择 Move to Trash
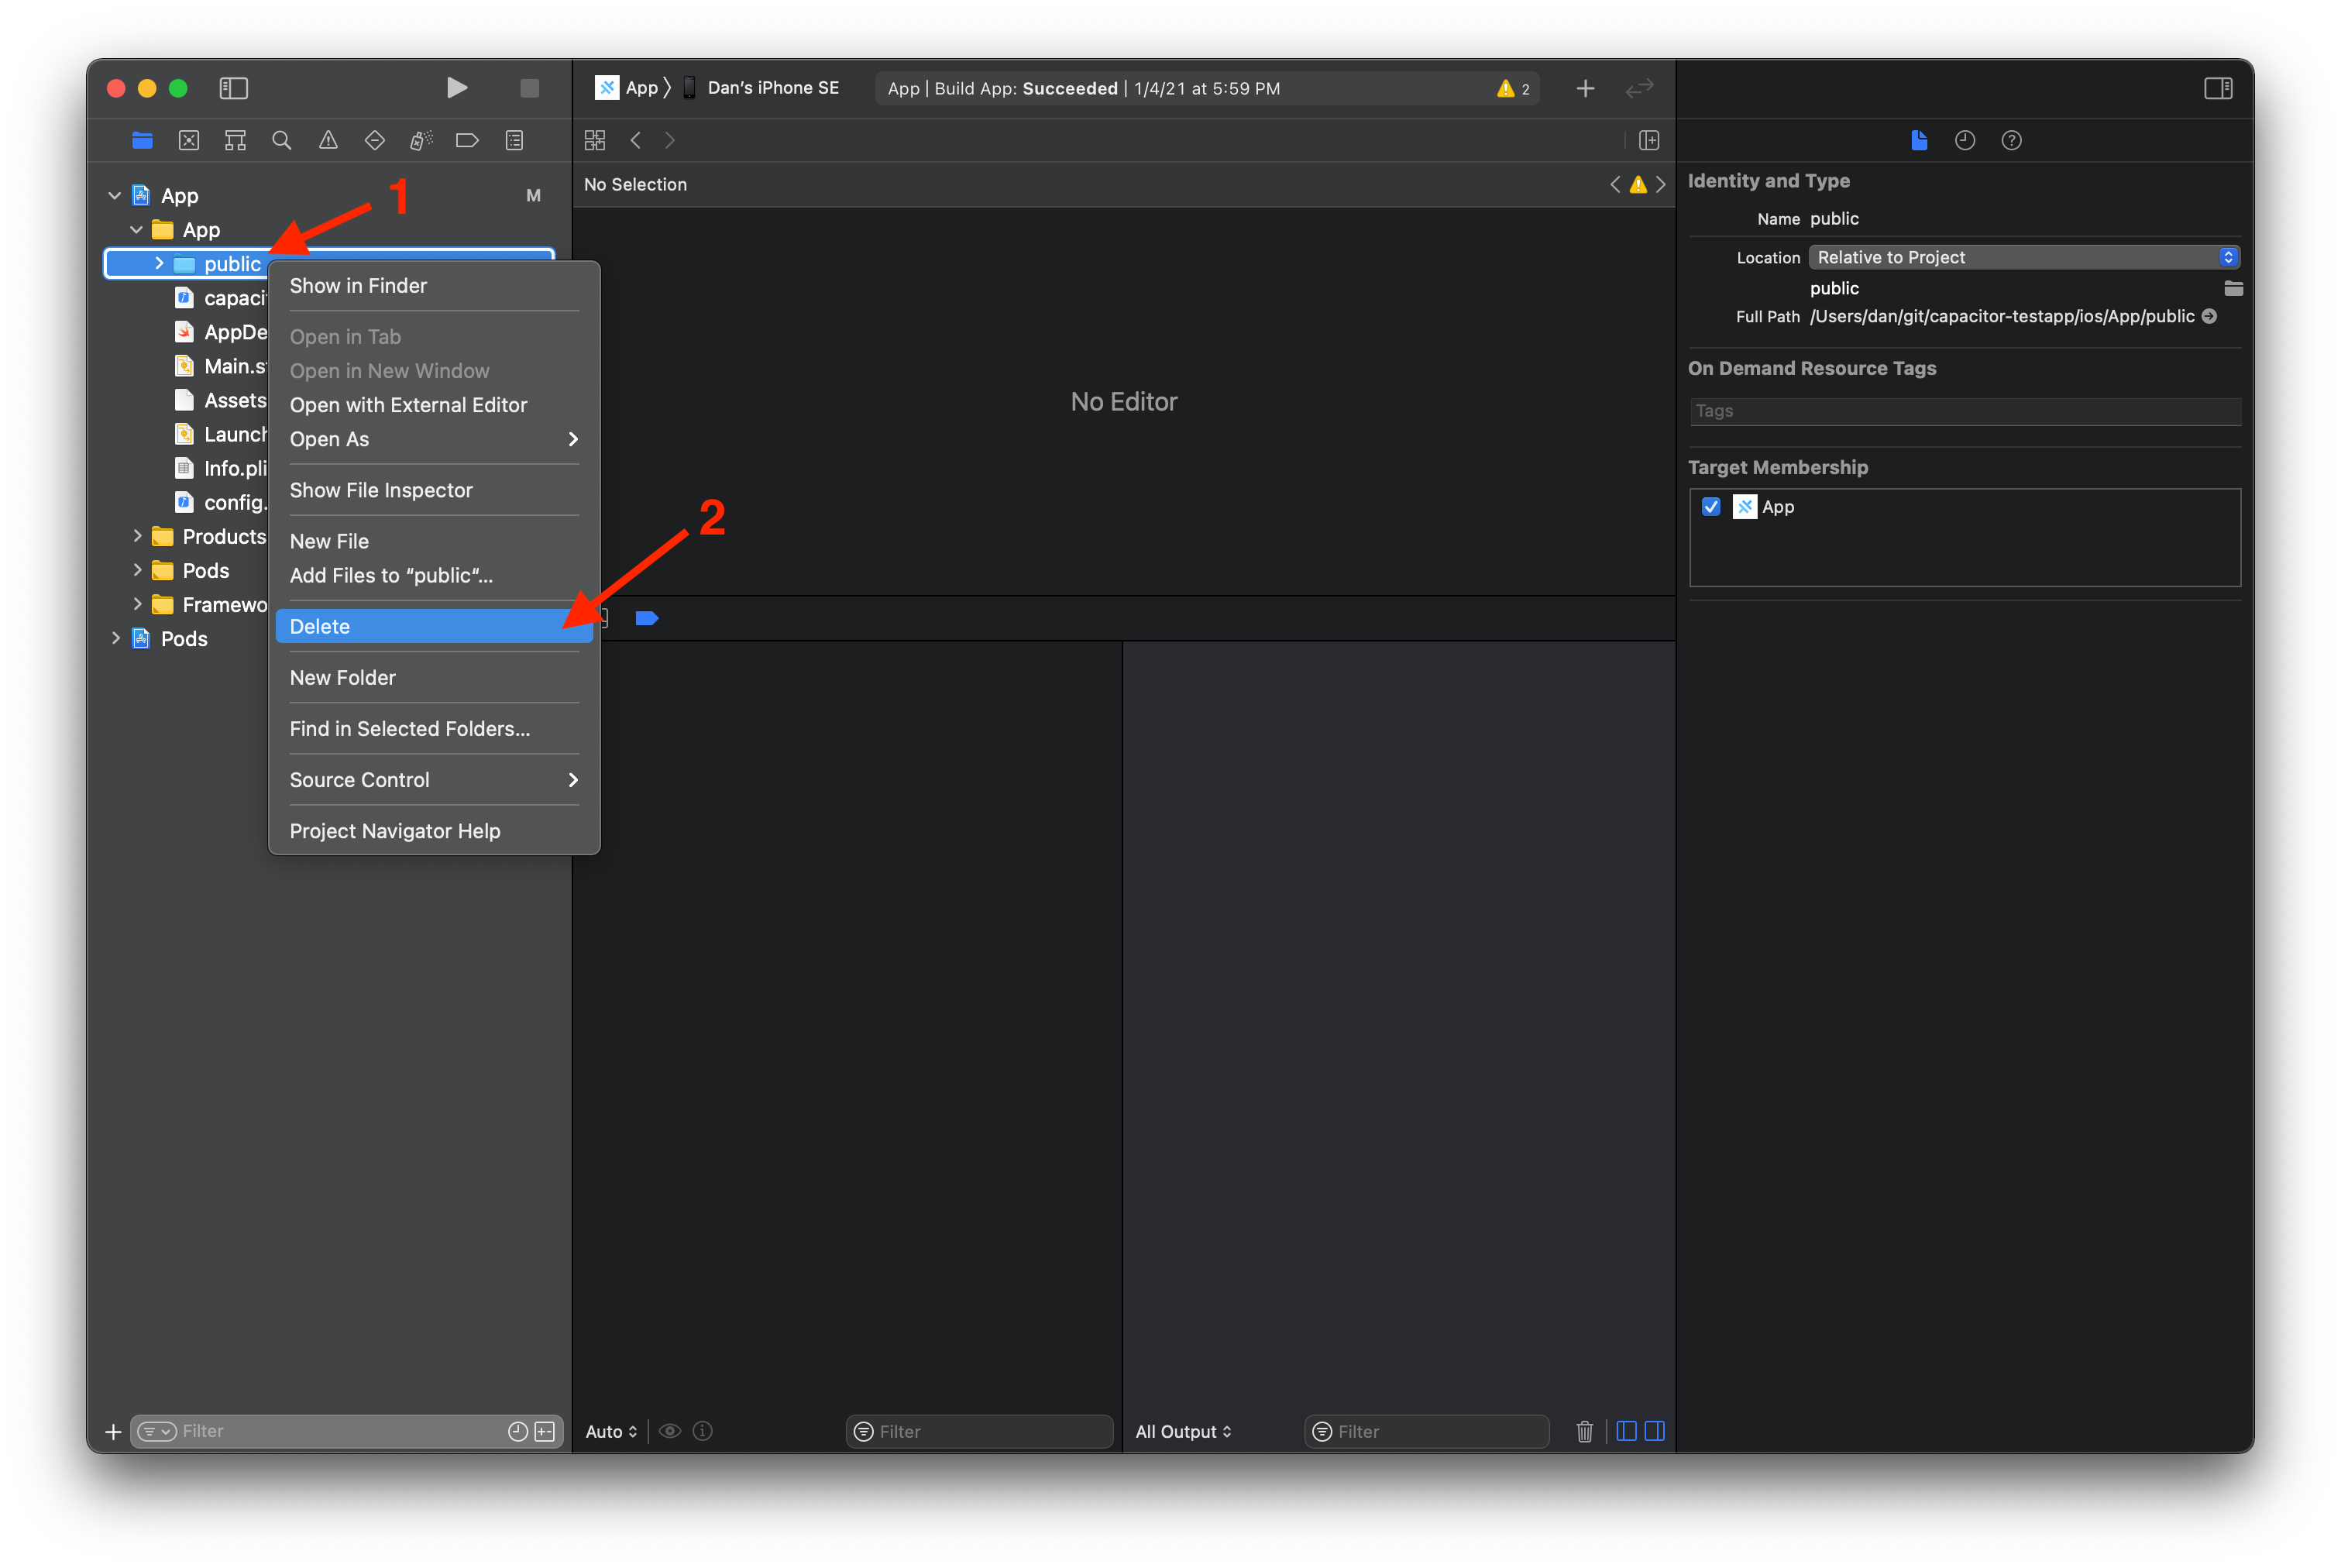
在新位置重新创建 public
- 右键单击
App项目内的App组,然后单击 Add Files to "App"... - 保留默认选项(确保创建文��件夹引用,而不是组,并添加到
App目标) - 单击 New Folder,命名为 "public"
- 单击 Create,然后单击 Add
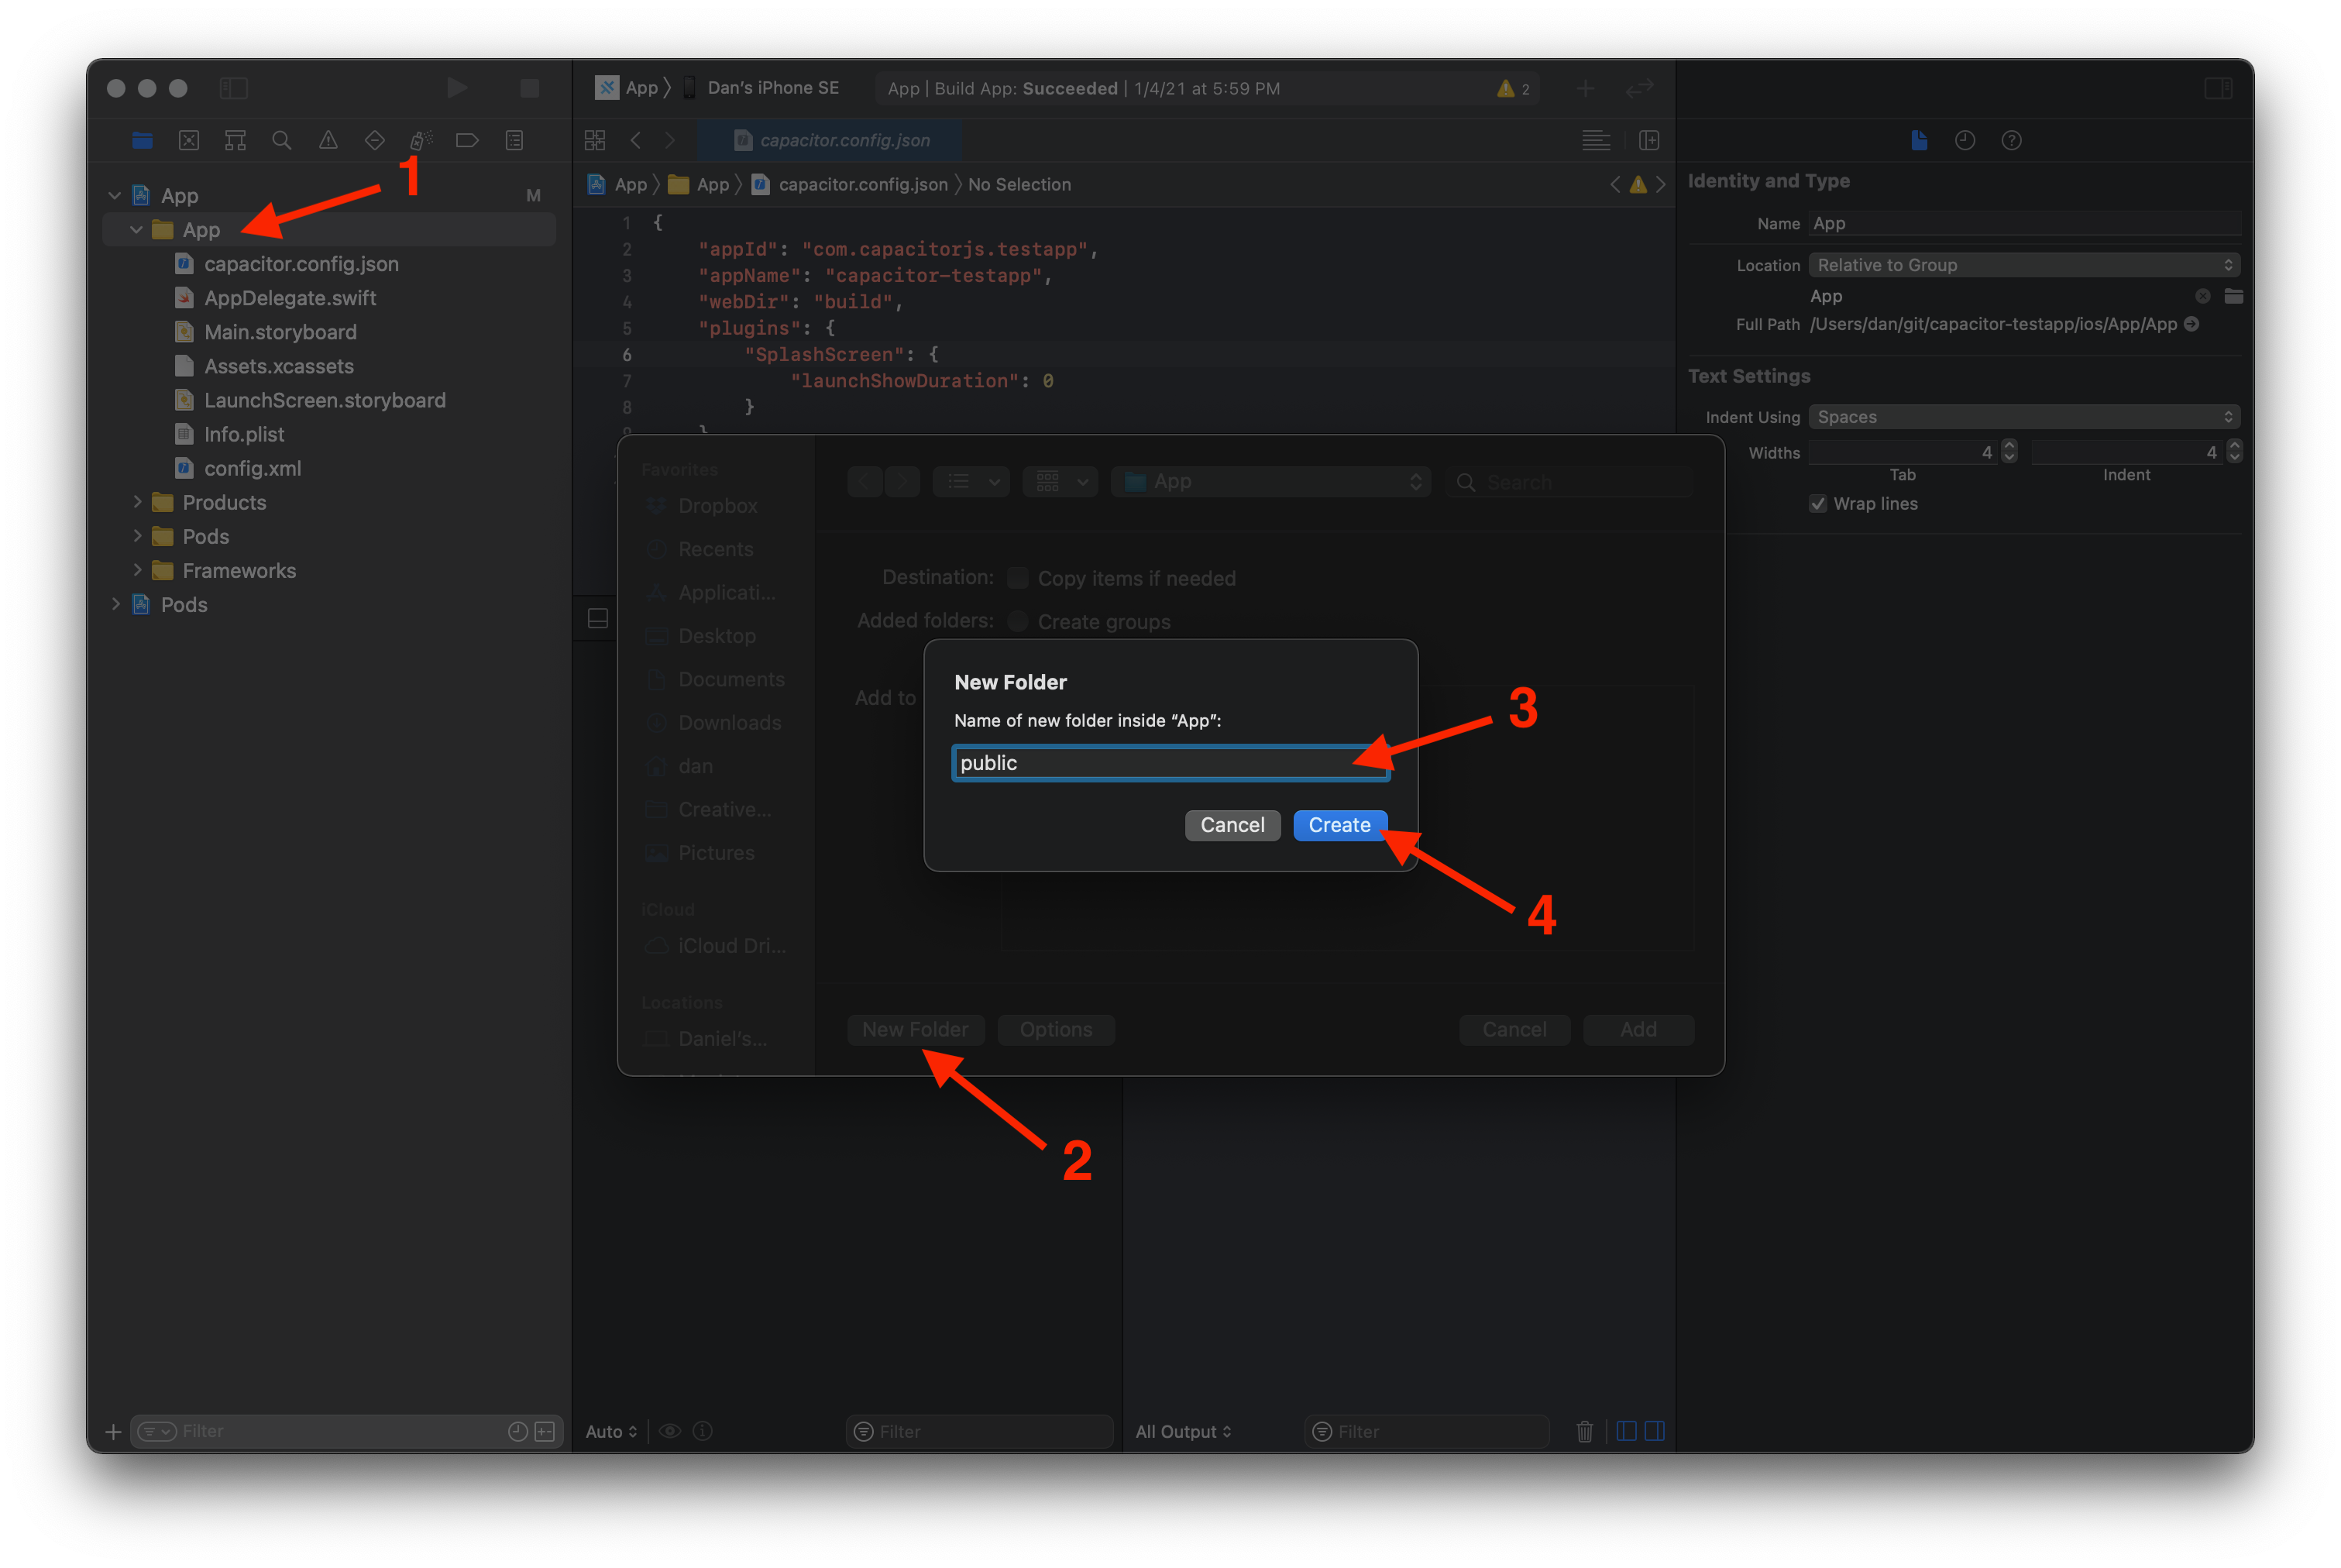
在 Xcode 中看起来可能一样,但新的 public 文件夹现在应该相对于 App 组,而不是项目根目录。
gitignore 新的 public 文件夹
在 ios/.gitignore 中,将忽略路径从 App/public 更改为 App/App/public。此文件夹包含你的 Web 资源的副本,不应提交。
 App/build
 App/Pods
-App/public
+App/App/public
 App/Podfile.lock
 xcuserdata
更新 Capacitor iOS 平台
npm install @capacitor/ios@latest-3
npx cap sync ios
在应用事件中从 CAPBridge 切换到 ApplicationDelegateProxy
在 ios/App/App/AppDelegate.swift 中,更新以下内容:
     func application(_ app: UIApplication, open url: URL, options: [UIApplication.OpenURLOptionsKey: Any] = [:]) -> Bool {
         // Called when the app was launched with a url. Feel free to add additional processing here,
         // but if you want the App API to support tracking app url opens, make sure to keep this call
-        return CAPBridge.handleOpenUrl(url, options)
+        return ApplicationDelegateProxy.shared.application(app, open: url, options: options)
     }

     func application(_ application: UIApplication, continue userActivity: NSUserActivity, restorationHandler: @escaping ([UIUserActivityRestoring]?) -> Void) -> Bool {
         // Called when the app was launched with an activity, including Universal Links.
         // Feel free to add additional processing here, but if you want the App API to support
         // tracking app url opens, make sure to keep this call
-        return CAPBridge.handleContinueActivity(userActivity, restorationHandler)
+        return ApplicationDelegateProxy.shared.application(application, continue: userActivity, restorationHandler: restorationHandler)
     }
移除 USE_PUSH 编译条件
如果使用推送通知功能,在 ios/App/App/AppDelegate.swift 中,更新以下内容:
-    #if USE_PUSH

     func application(_ application: UIApplication, didRegisterForRemoteNotificationsWithDeviceToken deviceToken: Data) {
        NotificationCenter.default.post(name: Notification.Name(CAPNotifications.DidRegisterForRemoteNotificationsWithDeviceToken.name()), object: deviceToken)
     }

     func application(_ application: UIApplication, didFailToRegisterForRemoteNotificationsWithError error: Error) {
        NotificationCenter.default.post(name: Notification.Name(CAPNotifications.DidFailToRegisterForRemoteNotificationsWithError.name()), object: error)
     }

-#endif
如果不使用推送通知,可以移除整个代码块:
-    #if USE_PUSH
-
-    func application(_ application: UIApplication, didRegisterForRemoteNotificationsWithDeviceToken deviceToken: Data) {
-        NotificationCenter.default.post(name: Notification.Name(CAPNotifications.DidRegisterForRemoteNotificationsWithDeviceToken.name()), object: deviceToken)
-    }
-
-    func application(_ application: UIApplication, didFailToRegisterForRemoteNotificationsWithError error: Error) {
-        NotificationCenter.default.post(name: Notification.Name(CAPNotifications.DidFailToRegisterForRemoteNotificationsWithError.name()), object: error)
-    }
-
-#endif
```### 从硬编码的 `CAPNotifications` 切换到 `NSNotification` 扩展

在 `ios/App/App/AppDelegate.swift` 中,更新以下内容:

```diff
     override func touchesBegan(_ touches: Set<UITouch>, with event: UIEvent?) {
         super.touchesBegan(touches, with: event)

         let statusBarRect = UIApplication.shared.statusBarFrame
         guard let touchPoint = event?.allTouches?.first?.location(in: self.window) else { return }

         if statusBarRect.contains(touchPoint) {
-            NotificationCenter.default.post(CAPBridge.statusBarTappedNotification)
+            NotificationCenter.default.post(name: .capacitorStatusBarTapped, object: nil)
         }
     }

     func application(_ application: UIApplication, didRegisterForRemoteNotificationsWithDeviceToken deviceToken: Data) {
-        NotificationCenter.default.post(name: Notification.Name(CAPNotifications.DidRegisterForRemoteNotificationsWithDeviceToken.name()), object: deviceToken)
+        NotificationCenter.default.post(name: .capacitorDidRegisterForRemoteNotifications, object: deviceToken)
     }

     func application(_ application: UIApplication, didFailToRegisterForRemoteNotificationsWithError error: Error) {
-        NotificationCenter.default.post(name: Notification.Name(CAPNotifications.DidFailToRegisterForRemoteNotificationsWithError.name()), object: error)
+        NotificationCenter.default.post(name: .capacitorDidFailToRegisterForRemoteNotifications, object: error)
     }
忽略 DerivedData
将 DerivedData 添加到 ios/.gitignore 文件中。这是 Capacitor CLI 存放原生 iOS 构建产物的地方。
 App/Pods
 App/App/public
 App/Podfile.lock
+DerivedData
 xcuserdata

 # Cordova plugins for Capacitor
Android
Capacitor 3 支持 Android 5+(现在也支持 Android 11)。需要 Android Studio 4+。
更新 Capacitor Android 平台
npm install @capacitor/android@latest-3
npx cap sync android
切换到自动加载 Android 插件
在 Capacitor 3 中,推荐自动加载 Android 插件。在 MainActivity.java 中,可以移除 onCreate 方法。当你通过 npm 添加或移除插件时,不再需要编辑此文件。
 public class MainActivity extends BridgeActivity {
-    @Override
-    public void onCreate(Bundle savedInstanceState) {
-        super.onCreate(savedInstanceState);
-
-        // Initializes the Bridge
-        this.init(savedInstanceState, new ArrayList<Class<? extends Plugin>>() {{
-            // Additional plugins you've installed go here
-            add(Plugin1.class);
-            add(Plugin2.class);
-        }});
-    }
 }
如果你的应用包含专门为你的应用程序构建的自定义插件,你仍然需要在 onCreate 中注册这些插件:
 public class MainActivity extends BridgeActivity {
     @Override
     public void onCreate(Bundle savedInstanceState) {
         super.onCreate(savedInstanceState);

+        registerPlugin(PluginInMyApp.class);
     }
 }
将 Gradle 更新到 7.0
我们现在推荐在 Capacitor 项目中使用 Gradle 7.0。在 Android Studio 中,打开 文件 菜单,然后点击 项目结构。在 项目 部分,将 Gradle 版本 更改为 7.0,并将 Android Gradle 插件版本 更改为 4.2.0。然后点击 确定。
你可能需要评估 项目结构 对话框的 建议 部分中建议的 Android 包更新。
更新 Android 变量
在 android/variables.gradle 中,你可以更新以下变量:
 ext {
     minSdkVersion = 21
-    compileSdkVersion = 29
-    targetSdkVersion = 29
+    compileSdkVersion = 30
+    targetSdkVersion = 30
+    androidxActivityVersion = '1.2.0'
-    androidxAppCompatVersion = '1.1.0'
+    androidxAppCompatVersion = '1.2.0'
+    androidxCoordinatorLayoutVersion = '1.1.0'
-    androidxCoreVersion =  '1.2.0'
-    androidxMaterialVersion =  '1.1.0-rc02'
-    androidxBrowserVersion =  '1.2.0'
-    androidxLocalbroadcastmanagerVersion =  '1.0.0'
-    androidxExifInterfaceVersion = '1.2.0'
-    firebaseMessagingVersion =  '20.1.2'
-    playServicesLocationVersion =  '17.0.0'
+    androidxCoreVersion = '1.3.2'
+    androidxFragmentVersion = '1.3.0'
-    junitVersion =  '4.12'
-    androidxJunitVersion =  '1.1.1'
-    androidxEspressoCoreVersion =  '3.2.0'
+    junitVersion = '4.13.1'
+    androidxJunitVersion = '1.1.2'
+    androidxEspressoCoreVersion = '3.3.0'
     cordovaAndroidVersion = '7.0.0'
 }
Capacitor 3 支持 Android 11(API 30),因此你可以将 SDK 目标更新到 30。将 compileSdkVersion 和 targetSdkVersion 改为 30。
新增了 androidxActivityVersion 变量,添加它并设置值为 1.2.0。
androidxAppCompatVersion 可以更新到 1.2.0。
新增了 androidxCoordinatorLayoutVersion 变量,添加它并设置值为 1.1.0。
androidxCoreVersion 可以更新到 1.3.2。
androidxMaterialVersion 变量过去由 Action Sheet 和 Camera 插件使用,如果不使用这些插件可以移除。如果使用,请查看 Camera 文档 和 Action Sheet 文档。
androidxBrowserVersion 变量过去由 Browser 插件使用,如果不使用该插件可以移除。如果使用,请查看 文档。
androidxLocalbroadcastmanagerVersion 变量可以移除。
androidxExifInterfaceVersion 变量过去由 Camera 插件使用,如果不使用该插件可以移除。如果使用,请查看 文档。
firebaseMessagingVersion 变量过去由 Push Notifications 插件使用,如果不使用该插件可以移除。如果使用,请查看 文档。
playServicesLocationVersion 变量过去由 Geolocation 插件使用,如果不使用该插件可以移除。如果使用,请查看 文档。
新增了 androidxFragmentVersion 变量,添加它并设置值为 1.3.0。
junitVersion 可以更新到 4.13.1。
androidxJunitVersion 可以更新到 1.1.2。
androidxEspressoCoreVersion 可以更新到 3.3.0。### 移除未使用和冗余的权限
根据您所使用的插件,您可以选择从应用的 AndroidManifest.xml 文件中移除未使用的权限。新版 Capacitor 应用中的清单文件 仅包含 INTERNET 权限,因为现在权限应在安装插件时添加。请按照以下步骤移除未使用的权限:
- 确定您的应用所使用的插件
- 在这些文档中阅读每个插件的安装说明,查找每个插件所需的权限
- 在您应用的
AndroidManifest.xml文件中,保留插件所需的权限,移除未使用的权限
Haptics 和 Network 插件就是现在将安装时权限包含在自身 AndroidManifest.xml 文件中的例子,这些文件最终会与应用的文件合并。从您应用的 AndroidManifest.xml 文件中移除它们的权限是安全的:
     <!-- 权限 -->

     <uses-permission android:name="android.permission.INTERNET" />

-    <!-- 网络 API -->
-    <uses-permission android:name="android.permission.ACCESS_NETWORK_STATE" />

-    <!-- 振动 API -->
-    <uses-permission android:name="android.permission.VIBRATE" />

 </manifest>